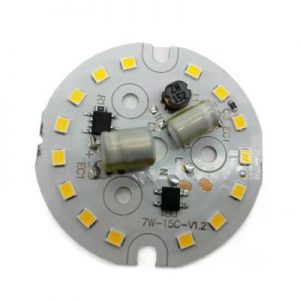
A diode is an electronic component with unidirectional conductivity. Its circuit symbol usually includes an arrow pointing to a vertical line, which represents the positive pole, while the vertical line represents the negative pole. This representation method is suitable for most types of diodes. If the diode symbol is bidirectional, it means that it has no polarity.
What is the symbol of diode LED?
The symbol of a diode in a circuit diagram usually consists of an arrow pointing to a vertical line, with a line extending from the arrow, where the arrow represents the positive pole of the diode and the vertical line represents the negative pole. If it is bidirectional, there is no polarity. In addition, there will be obvious markings on the appearance of the diode to distinguish its polarity.

Do LED diodes have a positive and negative?
LED diodes have a positive and negative pole.
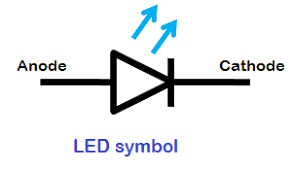
LED diodes are electronic devices with two electrodes: positive (anode) and negative (cathode). These two electrodes play different roles in the circuit. The positive pole is the end point where the current enters, and the negative pole is the end point where the current flows out. The unidirectional conductivity of the LED diode means that it will only conduct when a forward voltage is applied to its two ends, that is, it allows current to pass; when a reverse voltage is applied, it is cut off, preventing current from passing. This characteristic allows the LED diode to be used as a switch in the circuit to control the direction of current flow.
In practical applications, it is very important to determine the positive and negative poles of the LED diode, because incorrect connection may cause damage to the device or malfunction.
How to identify LED positive and negative?
There are many ways to determine the positive and negative poles of the LED diode, including observing the pin length, the position of the missing corner, the shape and size of the pin, the direction of the surface marking, etc. Some LEDs will have a “T” or inverted triangle symbol at the bottom, where the horizontal side of the “T” is the positive pole and the other side is the negative pole.
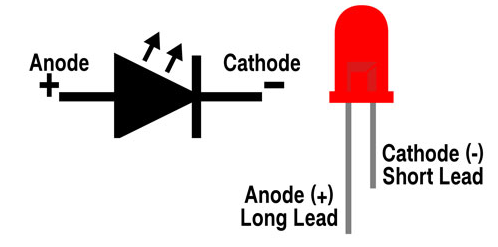
1. Observe the pin length: For direct-plug LED lamp beads, the longer end of the pin is usually the positive pole, and the shorter end is the negative pole. This is because the positive electrode is usually designed to be longer than the negative electrode during the manufacturing process.
2. Observe the size of the internal electrode: Inside the LED lamp bead, the smaller end is usually the positive pole, and the larger end is the negative pole.
3. Check the printed mark on the back of the board: On the back of the board of the SMD LED lamp bead, there is usually a “T”-shaped or inverted triangle symbol, where one end close to the horizontal side or the triangle side is the positive pole, and the other end is the negative pole.
4. Observe the printed lines on the board: One side of the colored line is usually the negative pole, and the other side is the positive pole.
5. Determine the size of the pad: The larger pad is the negative pole, and the smaller pad is the positive pole.
6. Check the missing corner of the front panel: One end of the missing corner is often the positive pole, and the other end is the negative pole.
7. Use a multimeter to test: Set the multimeter to the resistance or diode range. If the lamp bead lights up, the red test pen is in contact with the positive pole. When the light is on, the red test lead is connected to the positive pole and the black test lead is connected to the negative pole.
8. Use battery test: Use a 1.5V battery to connect the LED lamp bead. If the lamp bead lights up, the positive pole of the battery is connected to the positive pole of the LED lamp bead.
Through the above method, the positive and negative poles of the LED lamp bead can be effectively determined to ensure the correct connection of the circuit and avoid damage to the LED lamp bead.
What color is LED diode?
The color of the LED diode can be red, green, blue, yellow, white, etc.

The color of the LED diode mainly depends on the semiconductor material used. According to different application requirements, LED diodes can emit different colors of light, including but not limited to red, green, blue, yellow and white. In addition, white LEDs can be further subdivided into warm white, neutral white, pure white and cold white. The differences in these colors are mainly reflected in color temperature and hue, so as to meet different lighting and display needs.
1. Red LED: Mainly used in occasions such as indicator lights to provide eye-catching visual signals.
2. Green LED: Commonly used for digital display in display devices, such as calculators and electronic displays.
3. Blue LED: Combined with red and green LEDs, it can produce white light and is an important component in modern lighting technology.
4. Yellow LED: Used in various indicator lights and display devices to provide eye-catching visual prompts.
5. White LED: By combining red, green and blue primary color LEDs, it can produce rich colors and high-quality white light, which is widely used in lighting and display technology.
The packaging method of LED diodes also affects their appearance and application areas. For example, surface mount LEDs (SMD) are widely used in various electronic products due to their small and light characteristics. In addition, LED diodes can also be classified according to current levels to meet the needs of different circuits. These characteristics make LED diodes an indispensable component in modern electronic technology and lighting.
What happens if LED polarity is reversed?
LED polarity reversal may cause the LED light to not light up or be damaged.
When the positive and negative poles of an LED lamp are connected in reverse, the following situations may occur:
1. No light: This is the most common situation because the current flows through the LED in the opposite direction to the normal situation, causing the LED to not light up normally.
2. Unstable light: In some cases, certain types of LEDs may cause unstable light, such as flickering or frequent dimming, due to reverse polarity connection.
3. Damaged LED: Although some new LEDs may be able to withstand incorrect connections with reverse polarity, most common LEDs may burn out when the polarity is reversed, causing them to not work properly.
4. Lamp does not light up: If the positive and negative poles of an LED lamp are connected in reverse, it will generally not burn out, but it may cause the lamp to not light up. This may be because the current cannot pass through the LED normally, or because the circuit protection mechanism is activated due to reverse polarity, thereby preventing the current from passing.
Why do LED diodes fail?
The main reasons for the failure of LED diodes include overheating, overvoltage breakdown, current overload, and aging effects.
Overheating: When the heat generated by the LED during operation cannot be effectively dissipated, the temperature is too high, which may damage the internal structure of the LED and affect its performance.
Overvoltage breakdown: When the voltage across the LED exceeds its rated value, it may cause damage to its internal structure and fail.
Current overload: If the current flowing through the LED exceeds its rated value, it may cause the LED to burn out. Current overload is usually caused by improper circuit design or external factors.
Aging effect: Over time, LEDs may fail due to material aging. Aging effects are usually manifested as performance degradation, increased leakage current, etc.
Electrostatic discharge (ESD) damage: When the LED is subjected to electrostatic discharge shock, its internal structure may be damaged. To prevent electrostatic discharge damage, appropriate anti-static measures should be taken.
How do I know if my LED diode is bad?
If the LED diode can emit light normally under the appropriate operating voltage, it means that it is fine.
Make sure that the positive and negative poles of the LED diode are correctly connected to the circuit. Use the voltage measurement function of the multimeter to test the open circuit voltage of the circuit. If the test voltage is different from the expected value, there may be a problem with the circuit connection or the LED light-emitting diode.
Use the “diode test” position of the multimeter to test the diode. Insert the diode into the test hatch, connect the anode and cathode of the diode with the clamp, and connect the cathode to the test port. Observe the reading of the multimeter. If the reading is positive, it means that the diode is normal and can be turned on; if the reading is negative, it means that the diode is not good and cannot be turned on or reverse conduction.
Conclusion:
The application of diodes in daily electronics is very extensive. It can be used in almost all electronic circuits. The key to identifying diode symbols is to understand their basic shape and signs. It is necessary to correctly understand the symbol of the diode so that it can be safer and more efficient during use.
Tags: diode, diode symbol, LED


