How do you discharge a capacitor with a multimeter? You don’t directly use a multimeter to discharge capacitor. But it helps you check if the capacitor is safe after discharging. Always use the right method—resistor, discharge tool, or careful shorting—for the actual discharge step. Then, use your meter to confirm.
At Best Technology, we’re not just about making PCBs—we help make your job safer and easier. We’ve spent over 18 years building boards that last. From simple single-sided layouts to complex multilayer boards with embedded capacitors, we’ve seen it all. In today’s guide, we’ll walk you through how to discharge a capacitor using a multimeter. We’ll also share tips on safely discharging AC capacitors, how to handle them on circuit boards, and the proper use of a capacitor discharge tool. If you’re looking for a simple and safe method, you’re in the right place.
What is a Capacitor in a Circuit Board?
First of all, let’s know the definition of capacitor. A capacitor in a circuit board is like a small energy storage tank. It’s used to store electrical energy and release it when needed. On a circuit board, engineers use capacitors to stabilize voltage, reduce electrical noise, and smooth power supply fluctuations. For example, in audio systems, capacitors help remove unwanted signals so sound remains clean. In computers, they keep memory stable when power dips. Whether in large industrial machines or small wearable gadgets, capacitors play a quiet but essential role in reliable performance.
A capacitor stores extra electrical energy and delivers it when there’s a drop or loss in power. This backup helps devices run smoothly. But before working with any capacitor—especially when installing it in a new device—discharging it is a must for your safety.
Why Discharging a Capacitor Matters?
Capacitors can hold a charge long after power is turned off. This stored energy may not seem dangerous, but it can cause shocks, damage tools, or even ruin components. Therefore, discharging a capacitor is important because it removes any leftover electrical charge. Even when a device is turned off, the capacitor can still hold a charge. This charge can be strong enough to cause a shock or damage nearby parts. Let’s say you’re replacing a power supply board—if the capacitor isn’t discharged, you could get a sharp zap or even fry the replacement parts. Discharging keeps you, your tools, and your components safe.
What Happens If You Don’t Discharge a Capacitor?
If a capacitor stays charged, it can deliver a quick jolt. This can hurt. It might even surprise you enough to drop your tools. In some cases, it may spark or cause short circuits. Worse, it could damage sensitive components nearby. Ignoring this step puts your safety and your equipment at risk. It’s a small step that makes a big difference.
How to Check an AC Capacitor with a Multimeter?
Start by turning off the power. Wait for the system to cool if needed. Then, discharge the capacitor using a safe method (we’ll cover that soon). Once that’s done, set your multimeter to the capacitance setting. It usually looks like two parallel lines.
Next, remove the wires from the capacitor terminals. Connect your meter leads to each terminal. The reading should match the label on the capacitor. If it shows a much lower value or nothing at all, the part might be bad.
If your meter doesn’t have a capacitance setting, you can still check it. Set it to resistance (ohms). A good capacitor will show a quick jump in numbers, then settle back down. A bad one may read open (no change) or shorted (zero).
How Do You Safely Discharge a Capacitor?
There are three common ways to discharge capacitor.
1. Use a Resistor
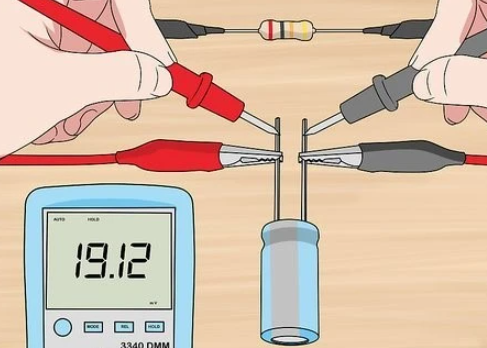
This is one of the safest methods. Get a resistor between 5k to 20k ohms and rated at 5 watts or more. Hold the resistor leads with insulated clips or pliers. Touch one lead to the positive terminal, and the other to the negative. Hold it for a few seconds. The stored energy will bleed off slowly. This way is easy and safe for DIY projects.
2. Use a Capacitor Discharge Tool
A capacitor discharge tool is a safer version of the resistor method. It’s built with proper insulation, clips, and a discharge resistor inside. Some versions even have an LED indicator to show when the voltage is gone. If you work with capacitors often, this tool is worth having. It’s faster and safer than makeshift methods. Its schematic shows as below:
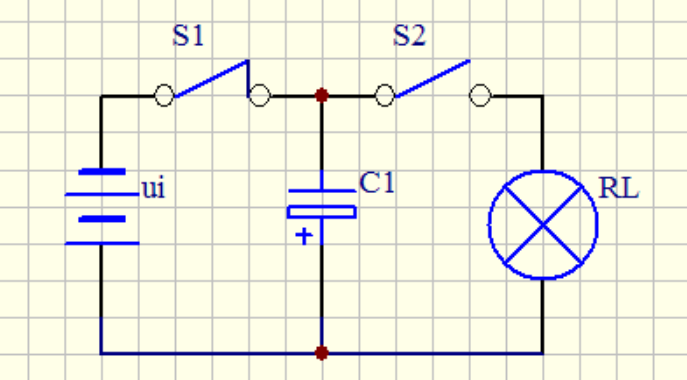
When the switch S1 is on and S2 is off, the capacitor is charged.
When S1 is off and S2 is on, the capacitor discharges to the LED.
3. Use a Screwdriver (Only for Low-Voltage Circuits)
Only use this method on capacitors below 50V. Use a screwdriver with an insulated handle. Touch both terminals at the same time. You might see a small spark. Wait a few seconds, then check again. It’s simple but risky—avoid using it on high-voltage parts.
What Is the Process of Discharging a Capacitor with a Multimeter?
First, check if your multimeter has a built-in discharge function. Most don’t. But some digital models made for electronics might.
If not, you’ll need to discharge the capacitor before using the multimeter. Here’s how:
- Turn off and unplug the device.
- Use a capacitor discharge tool or resistor as explained above.
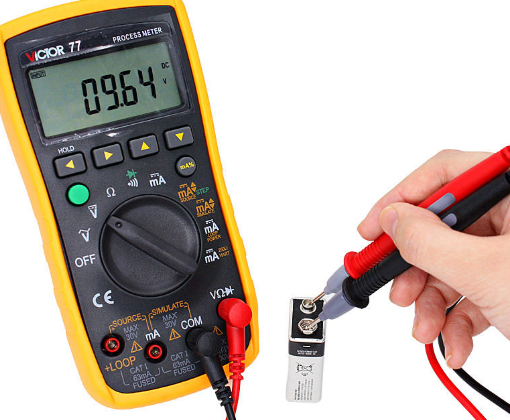
- After discharging, use the multimeter to check the voltage across the terminals.
- Set the meter to DC volts if it’s an electrolytic capacitor.
- If the reading is near zero, it’s safe to handle or test further.
Multimeters are not designed to remove charge. Their job is to measure. Forcing a multimeter to discharge can damage it. Always use the right tool for the job.
How Long Does It Take to Discharge a Capacitor?
The time varies depending on the capacitor’s size and the method used. Small capacitors may discharge in under a second. Larger ones can take several seconds or more. Using a proper resistor makes it slower but safer. A fast discharge can cause sparks or damage.
For example, using a 10k ohm resistor on a 470uF capacitor may take around 5–10 seconds. If you’re using a capacitor discharge tool with a visual indicator, you’ll know when it’s done. Always wait a bit longer than you think you need. Safety first.
What Happens After a Capacitor Is Discharged?
Once a capacitor is fully discharged, the voltage across its terminals drops to zero or close to it. That means it’s safe to touch or work on. You can test it, replace it, or solder it without the risk of shock.
Discharging doesn’t harm the capacitor. It only removes stored energy. In fact, this step protects both the capacitor and everything around it. It’s just like emptying a water bottle before cleaning it—simple, safe, and smart.
How to Check if a Capacitor Is Discharged?
The best way is to use a multimeter. Set it to DC voltage. Touch the leads to each terminal. Check the radings. If the reading is under 1 volt, the capacitor is discharged. If it shows higher, wait or try discharging again.

Some people also use a discharge tool with an LED. When the light goes off, it means the charge is gone. This is quick and useful, especially in tight spaces or when working with multiple parts.
Another trick is to short the terminals with a resistor and listen. If you hear a faint pop or see a spark, it was still charged. If nothing happens, it’s likely safe.
Do I Need to Discharge a New Capacitor Before Installing?
Most new capacitors come with no charge. They haven’t been connected to power, so they’re usually safe. But if the part has been tested, returned, or used before, it might still hold a small charge.
To be safe, check it with your multimeter. If there’s any voltage, discharge it. It takes only a few seconds and adds an extra layer of safety.
Even in a factory, charged capacitors can slip through if they were tested. So, it’s good practice to check every time, even if the part is new. Better to be safe than sorry.
Final Thoughts
If you’re regularly dealing with circuit boards or electronic repairs, investing in a capacitor discharge tool and a reliable multimeter can make your job easier and safer. Plus, learning how to measure capacitance can help spot failing parts before they cause bigger problems.
Need help sourcing safe, high-quality components? Our team at Best Technology offers expert solutions for all types of PCBs, including ones with advanced capacitor layouts. With over 18 years in the industry, we know how to match the right part to your design. From testing tips to full production runs, we’ve got you covered.
Whether you need help with one board or thousands, we’re ready. Partner with us for quality that lasts. With Best Technology, your circuit is in good hands. Get reach with us for more information about PCB repair or PCB manufacturing!