

Definition of a 95x64mm Strip Board
The 95x64mm strip board, commonly known as stripboard or veroboard, is a versatile tool used in PCB prototyping. This type of board is pre-drilled with holes arranged in a grid pattern, with copper strips running parallel to one side. The size, 95x64mm, refers to its dimensions: 95 millimeters in length and 64 millimeters in width.
A 95x64mm strip board is a specific size of stripboard. It’s a board with a grid of holes and copper strips that are connected to facilitate the easy construction of electronic circuits. The copper strips can be cut and modified to create connections between different components, making it an invaluable tool for hobbyists and engineers alike.
How to Cut a Stripboard to Size?
Cutting a stripboard to size is essential when working on custom electronic projects, as the default size of the board might not always fit your design requirements. While the process may seem simple, precision is important to ensure a clean cut and a properly functioning circuit. Here’s a step-by-step guide on how to cut a stripboard efficiently:
1. Measure the Required Size
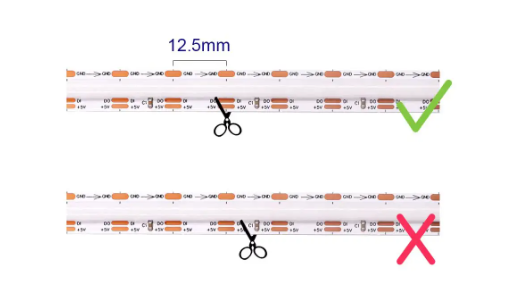
Before making any cuts, it’s crucial to measure the exact size of the stripboard you need for your project. Use a ruler or measuring tape to determine the length and width of the area you will be working with.
After measuring, use a pencil or fine-tip marker to draw cutting lines on the board. It’s essential that the lines are precise and straight. You can use the pre-drilled holes on the stripboard as a guide, ensuring that your cuts are aligned with the rows and columns of the board.
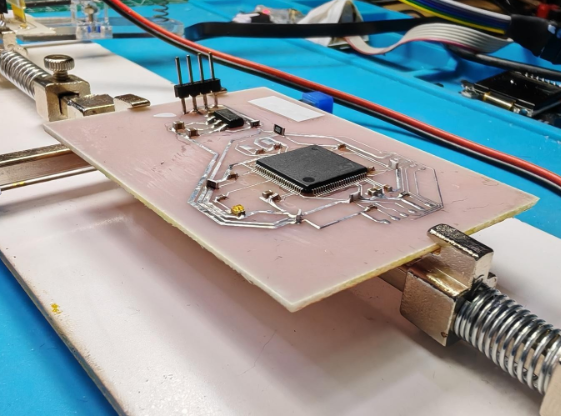
2. Prepare the Work Area
Set up your workspace to ensure that you have a safe and stable area for cutting. Place the stripboard on a flat, stable surface, such as a cutting mat or a workbench. To avoid slipping while cutting, use clamps or a vise to secure the stripboard in place.
3. Cutting Tools
Choose the right tool for the job. A few common tools for cutting a stripboard include:
- Fine-toothed hacksaw: Ideal for making precise cuts through the stripboard material without damaging the copper strips.
- Rotary tool (Dremel): A rotary tool with a cutting wheel can make cleaner and more controlled cuts. It’s especially useful for intricate or delicate work.
- Score and snap method: For small, simple cuts, you can score the board with a sharp utility knife along the marked lines. Once scored deeply, you can snap the board along the cut line.
4. Cut Carefully
Once your stripboard is secure and you have chosen the right tool, it’s time to cut. Begin by gently sawing along the marked line. Use steady, even pressure, allowing the saw to do the work. Avoid rushing the cut, as this could lead to uneven or jagged edges. For more precise cuts, guide the rotary tool along the cutting line with steady pressure. The rotary tool can provide smoother edges, but take care to maintain control over the tool for safety and accuracy.
5. Finish the Cut
After the board has been cut, you may notice that the edges are rough or uneven. Smoothing the edges will prevent accidental shorts or damage to the board’s components.
- File the edges: Use a fine-grit file or sandpaper to carefully smooth out the rough edges of the board. This step is particularly important if you are working with sensitive components or high-density circuits, as sharp edges can lead to unwanted contact with other parts.
- Check the copper strips: After smoothing the edges, inspect the copper strips on the cut board. Ensure that no copper traces have been damaged during the cutting process. If necessary, you can use a small utility knife or a file to clean up any rough spots near the copper strips.
6. Cutting Strips (Optional)
In many cases, you’ll also need to cut the copper strips on the underside of the board to isolate specific circuits or prevent unwanted connections. Use a small drill bit, sharp knife, or strip cutter to make small breaks in the copper strips where needed. Carefully break the strip without damaging the surrounding area. These cuts should align with your circuit design to ensure proper functionality.
Difference Between a Strip Board and a Breadboard
While both strip boards and breadboards are used for prototyping, they have distinct differences:
Strip boards have fixed copper strips on one side, which makes them suitable for permanent or semi-permanent circuit assembly. They require soldering to connect components.
Howevery, breadboards are used for temporary circuit designs. They have a grid of holes that allow for easy insertion and removal of components without soldering. They are ideal for testing and experimenting with different circuit configurations.
What Size is a Stripboard?
Stripboards come in a variety of sizes, allowing engineers, hobbyists, and professionals to choose the right one for their projects. A standard stripboard typically measures around 100x160mm, but smaller or larger sizes are available depending on the complexity and scope of the circuit being designed. One of the most commonly used sizes for prototyping is the 95x64mm stripboard, which offers a compact but functional area for small to mid-range circuits, like:
1. 25 x 64 mm: Has 9 rows and 25 holes
2. 64 x 95 mm: Has 24 rows and 37 holes
3. 95 x 127 mm: Has 36 rows and 50 holes
4. 50 x 80 mm: Also known as the ST1 StripBoard, this is 1.97 x 3.15 in and 1/16 in thick
5. 160 x 100 mm: A common size in the United Kingdom
6. 160 x 233 mm: A standard double height (6U) Eurocard/VME size, which is 9.2 in wide, 6.3 in long, and 1/16 in thick
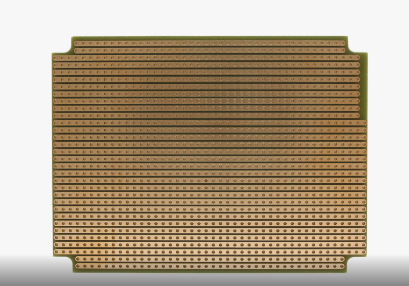
Stripboards are prototyping boards made from insulating material, like fiberglass or resin-bonded plastic. One side of the board has parallel copper strips that are typically spaced 2.54 mm apart.
Layout of a Stripboard
The layout of a stripboard is quite functional:
Copper Strips: One side of the board has copper strips running parallel to each other. These strips can be cut to create breaks and allow for more flexible circuit designs.
Holes: The board is drilled with a grid of holes that line up with the copper strips. Components can be inserted into these holes, and connections can be made by soldering to the copper strips.
Breaks and Jumps: To customize the circuit, you can cut the copper strips or use wire “jumps” to make connections that don’t follow the copper strips.
Difference Between Donut Board and Strip Board
Board Structure and Layout
Donut boards, also known as perfboards, have isolated copper pads around each hole, meaning no automatic connections between adjacent holes. In contrast, stripboards have parallel copper strips that connect rows of holes, allowing predefined electrical connections.
Component Placement
On donut boards, components can be placed freely without layout restrictions. Stripboards, however, require components to align with the copper strips, which can limit layout flexibility but simplify organization for linear designs.
Wiring and Soldering
With donut boards, each connection must be made manually, which increases soldering time. Stripboards reduce wiring by offering predefined connections, but cutting the strips may still be necessary for more intricate designs.
Fault Diagnosis
Diagnosing faults on a donut board is easier because each connection is made manually, allowing clear visibility of potential issues. On a stripboard, diagnosing faults can be more difficult due to the copper strips, which may cause unintentional short circuits.
As an advanced PCB and PCBA manufacturer, we have over 18years manufacturing experience. “High mixed, low volume, high quality and fast delivery” is our core values. 70% of our employees are the core memebers in our company, they have professional and rich skills in this industry. Contact us for your PCB projects!